定制自己的OpenWrt固件
1. 准备工作
- 硬件:推荐:4核8G 30G以上的硬盘
- 网络:国外的网络环境或国内科学上网环境为宜
- 系统:推荐Debian11
- 其他:准备一个非root用户
- 项目:选择一个OpenWrt或其他衍生项目(这里用LEDE)。
2. 安装依赖
用非root用户登录服务器,执行以下命令安装依赖:
更新源 |
3. 克隆项目
克隆项目到非root用户目录下:
git clone https://github.com/coolsnowwolf/lede |
4. 个性化配置
进入项目目录,可按需求修改固件默认配置:
软件源配置
cd lede
修改软件源配置
vim feeds.conf.default
根据需求增减软件源
src-git packages https://github.com/coolsnowwolf/packages
src-git luci https://github.com/coolsnowwolf/luci
src-git luci https://github.com/coolsnowwolf/luci.git;openwrt-23.05
src-git routing https://github.com/coolsnowwolf/routing
src-git telephony https://github.com/openwrt/telephony.git;openwrt-23.05
你可能需要helloworld源
src-git helloworld https://github.com/fw876/helloworld.git
src-git oui https://github.com/zhaojh329/oui.git
src-git video https://github.com/openwrt/video.git
src-git targets https://github.com/openwrt/targets.git
src-git oldpackages http://git.openwrt.org/packages.git
src-link custom /usr/src/openwrt/custom-feed
修改完feeds.conf.default后执需要执行更新并安装插件
./scripts/feeds clean
./scripts/feeds update -a
./scripts/feeds install -a默认IP配置
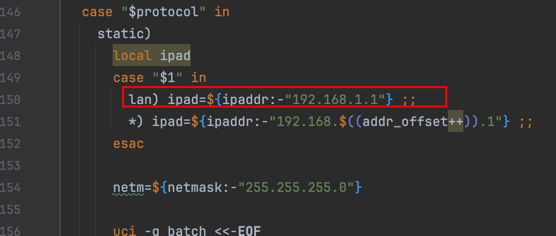
可在package/base-files/files/bin/config_generate文件中修改默认IP
推荐使用vim打开文件进行修改,不要使用sed避免不同版本内容不同而匹配不到或匹配到其他地方!
vim package/base-files/files/bin/config_generate
如下图在case协议为static这个代码块里面 将192.168.1.1修改为你想要的默认IP

默认主机名配置
vim package/lean/default-settings/files/zzz-default-settings
在大概16行附近有 uci commit system
在 uci commit system 之前添加 uci set system.@system[0].hostname='YourHostname' 添加完效果如下
uci set system.@system[0].hostname='YourHostname'
uci commit system默认主题配置
vim feeds/luci/collections/luci/Makefile
找到如下配置
LUCI_DEPENDS:= \
+uhttpd +uhttpd-mod-ubus +luci-mod-admin-full +luci-theme-bootstrap \
+luci-app-firewall +luci-proto-ppp +libiwinfo-lua \
+rpcd-mod-rrdns
将 luci-theme-bootstrap 修改为你想要的主题
5. 配置编译选项
- 执行
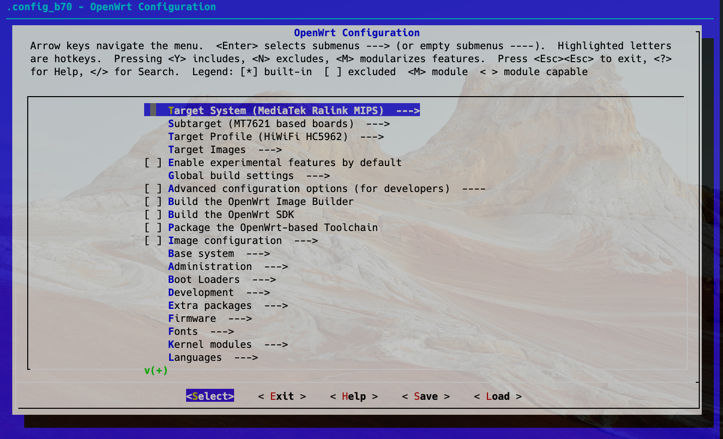
make menuconfig进入编译配置菜单,如下入所示
这里以极路由B70为例子选择 CPU 类型
Target System # 这里是选择芯片平台的,我的是MT7621CPU属于MediaTek Ralink MIPS,不清楚选哪个的可以用你的CPU型号在网上搜
Subtarget # 这里是选择CPU型号的,我的是MT7621,所以选 MT7621
Target Profile # 这里是选择路由器型号的,我的是极路由B70,所以选 HiWiFi HC5962。如果列表中没有你的路由器型号,这里可以选硬件配置和你路由器硬件配置一样的。
设置镜像编译的格式(squashfs,ext4)
Target Images # 默认 squashfs 即可
针对X86软路由需要添加较多插件时,为了避免空间不足,建议修改下面两项默认大小(x86/64)
Target Images --> (16) Kernel partition size (in MB) # 默认是16,建议修改为256
Target Images --> (400) Root filesystem partition size (in MB) # 默认是400,建议修改为1024
Enable experimental features by default # 实验室功能 为了稳定默认不选
开启 IPv6 支持
Extra packages --> ipv6helper(选定这个后,下面几项会自动选择)
Network --> odhcp6c
Network --> odhcpd-ipv6only
LuCI --> Protocols --> luci-proto-ipv6
LuCI --> Protocols --> luci-proto-ppp
选择应用 这里有应用对照表 https://github.com/coolsnowwolf/lede/issues/2415
LuCI --> Applications # 根据需要选择,* 代表编入固件,M 表示编译成模块或者IPK包,为空表示不编译
选择主题
LuCI --> Themes # 选择喜欢的主题,可以选多个
其他选项一般不需要调整,如感兴趣可以自行了解
6. 开始编译
预下载编译所需的软件包 |
本博客所有文章除特别声明外,均采用 CC BY-NC-SA 4.0 许可协议。转载请注明来自 Eber的小窝!
评论


